
Is Burden of Proof one of Starfield’s most frustrating and irritating quests? This answer is probably yes for a large portion of Starfield players across the globe. However, the quest’s complexity and length are very inspiring for Starfield players looking to do some detective work and learn even more about the enigmatic Lieutenant Toft aboard the UC Vigilance, who despises Starfield’s pirate faction. Let’s first explain what this faction side mission for the Crimson Fleet is about before delving into the intricacies of the quest.
This guide will showcase all the Burden of Proof evidence locations spanning multiple planets and star systems. We will explain how to acquire the evidence while listing the missable ones, meaning you will have only one chance to get them.
Burden of Proof is one of the few “incremental” quests in Starfield, meaning it will take a while to collect all the evidence Lieutenant Toft requires to incriminate the Crimson Fleet‘s members.
How to Start Burden of Proof
Players will be tasked with acquiring evidence of the Crimson Fleet’s crimes and delivering them to Lieutenant Toft on UC Vigilance at the start of the Deep Cover mission. As most people already know, there are two ways to start Deep Cover, and thus, Burden of Proof:
- Lawful approach: Join the UC Vanguard by completing Supra et Ultra and Grunt Work. Deep Cover will be assigned to you by Commander Tuala once you complete Grunt Work, along with the third faction mission for the UC Vanguard, Delivering Devils (you can complete both missions). This path requires you to get to UC Vigilance and talk to Commander Ikande in the Operations Center.
- Nasty approach: Get yourself a bounty and get apprehended in UC-controlled territory. Instead of just paying the bounty and losing all stolen and contraband items, you will be transferred for interrogation by Commander Ikande at the UC Vigilance before you meet him in the starship’s Operations Center.
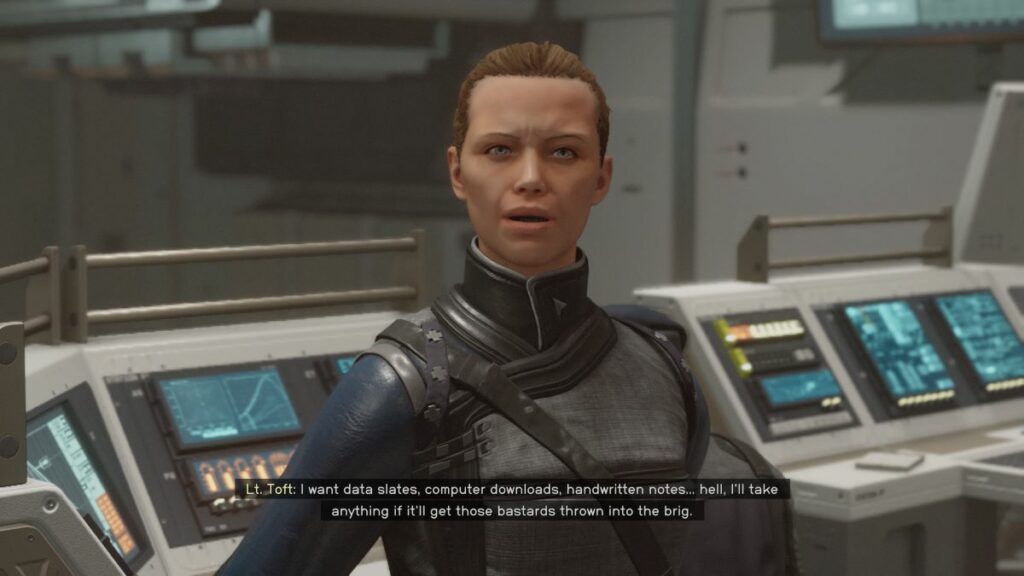
The two paths merge once the conversation with Commander Ikande starts inside the Operations Center. After you agree to become UC SysDef’s double agent inside the Crimson Fleet, Lieutenant Toft will ask you to look for data slates, audio slates, hand-written letters, or any other kind of evidence that will help US SysDef bring the Crimson Fleet to justice.
How to Complete Burden of Proof
You can collect 20 pieces of evidence around the Settled Systems for the Burden of Proof faction mission. However, to complete the quest and receive Lieutenant Toft’s final reward, you must deliver her 15 pieces of evidence. Each time you deliver a piece of evidence to Lieutenant Toft, you will receive XP and Credits, even after you have completed the quest in your mission log.
Where to Look for Burden of Proof Evidence?
While our guide will showcase all Burden of Proof evidence, here is a tip if you don’t want all the fun spoilt for you: Look for evidence at The Key, during Crimson Fleet faction and side missions, inside every bar you enter, and every popular location for smugglers you are aware of.
And now, without further ado, it’s time to reveal all Burden of Proof evidence locations.
The Naeva Meetup
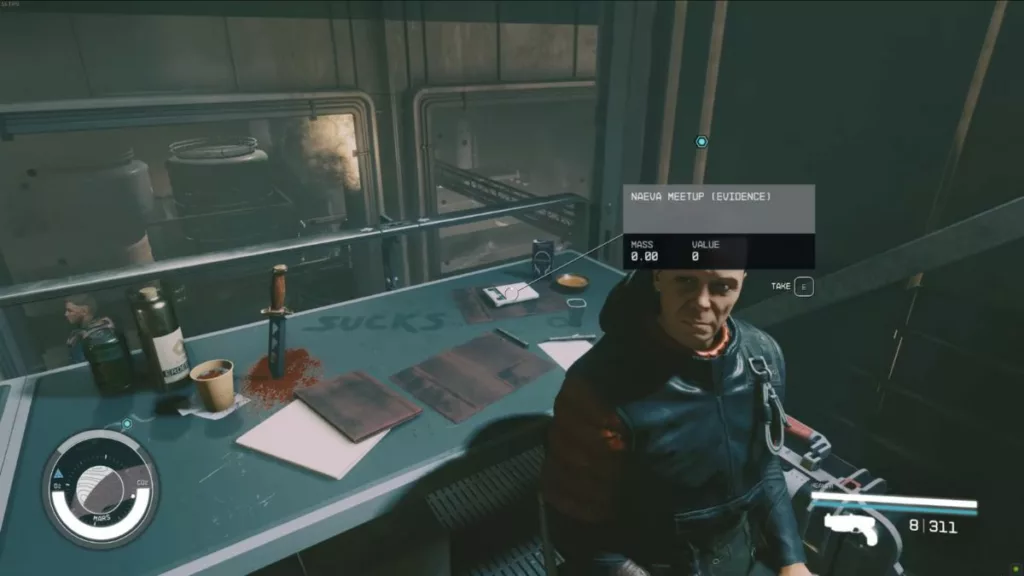
Location: Cydonia/Mars/Sol (During Deep Cover and beyond)
During Deep Cover, you are not a Crimson Fleet member yet, but Burden of Proof is an ongoing quest. When you meet Adler Kemp inside Cydonia’s Broken Spear bar, you will find the Naeva Meetup (Evidence) data slate on the table behind him. This evidence is not missable, as it will remain on the table even after Deep Cover.
Carter’s Gig
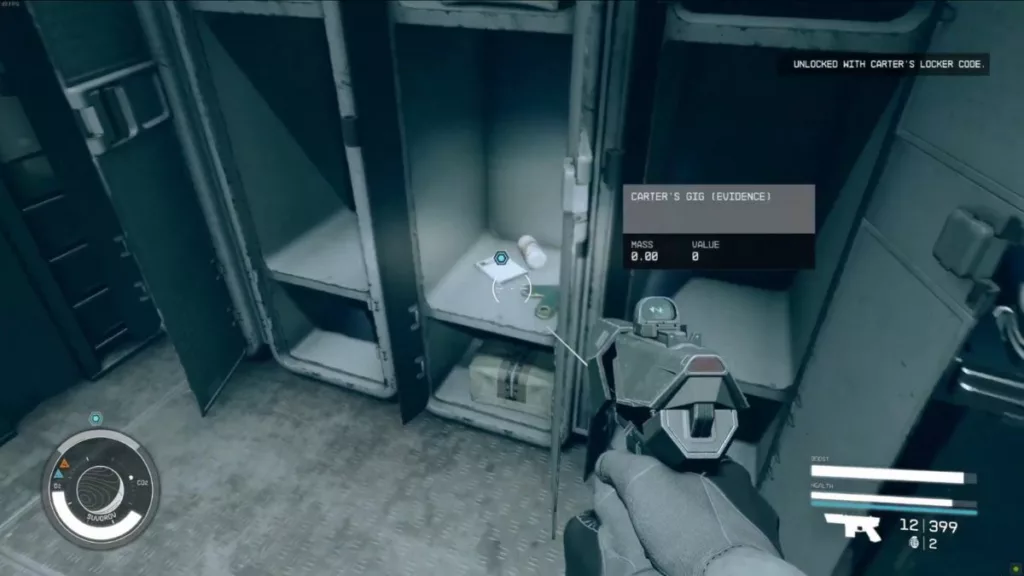
Location: The Lock/Suvorov/Kryx (During Echoes of the Past)
Moving from Deep Cover to the next faction mission, Echoes of the Past, you will find the next piece of evidence, Carter’s Gig. Carter’s Gig (Evidence) is not missable. It’s inevitable, as it’s part of the mission’s objectives and can be found inside Carter’s locker in section D-02’s showers.
Warden’s Log
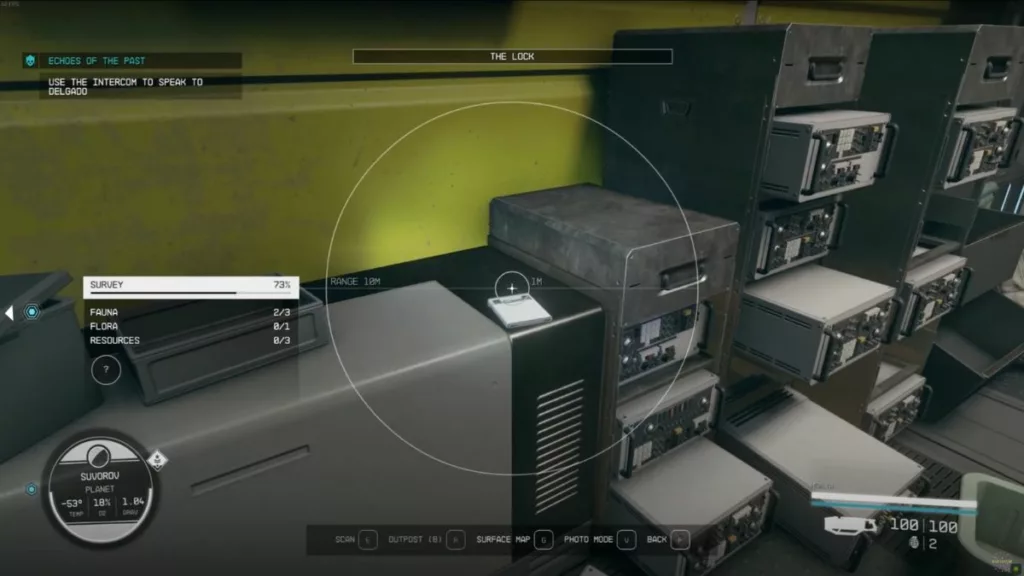
Location: The Lock/Survov/Kryx (During Echoes of the Past and beyond)
Once you reach the Warden’s Office during Echoes of the Past, you will find Warden’s Log (Evidence) on a cabinet on the right side of Mathis Castillo and the intercom device, you must use to speak to Delgado. For those unaware, you can fast-travel to The Lock and enter it even after Echoes of the Past, so this evidence is not missable either.
Request Denied (Missable)
Request Denied (Evidence) is missable, as you cannot return to Siren of the Stars after Breaking the Bank.
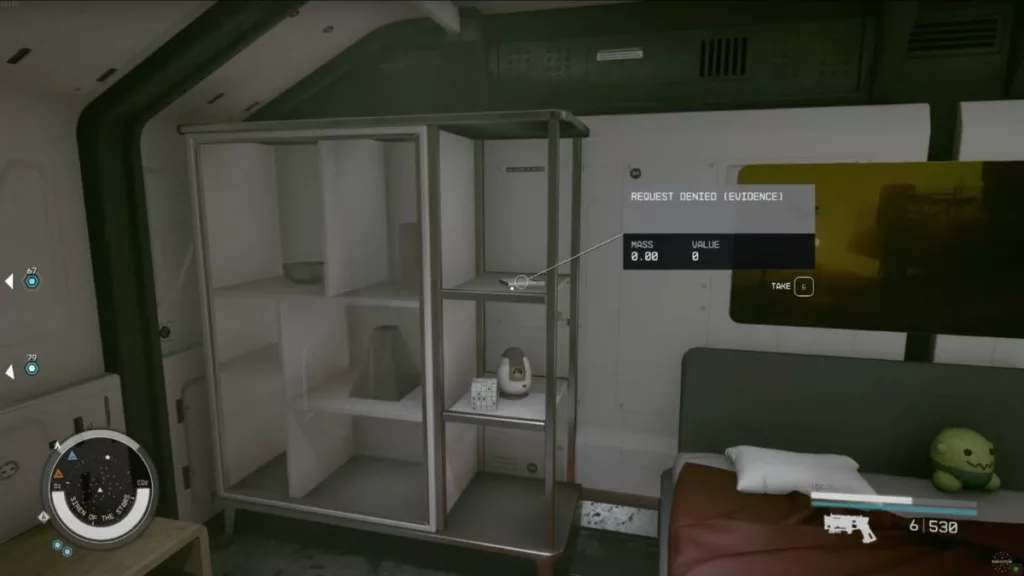
Location: Siren of Stars/Aranae system (During Breaking the Bank)
Once you board the Siren of the Stars and right after talking to Rokov, you can head up through the crew quarters and, in particular, the captain’s quarters, Rokov’s room. As you ascend the stairs, you will find the entrance to Rokov’s room on the opposite side of the large upper area, next to a Boom Bop vending machine. You will find Request Denied (Evidence) on a self on the left side of the bed inside the captain’s bedroom.
GalBank Plan (Missable)
GalBank Plan (Evidence) is missable, as you must perform certain actions with Gabriel Vera to get it.
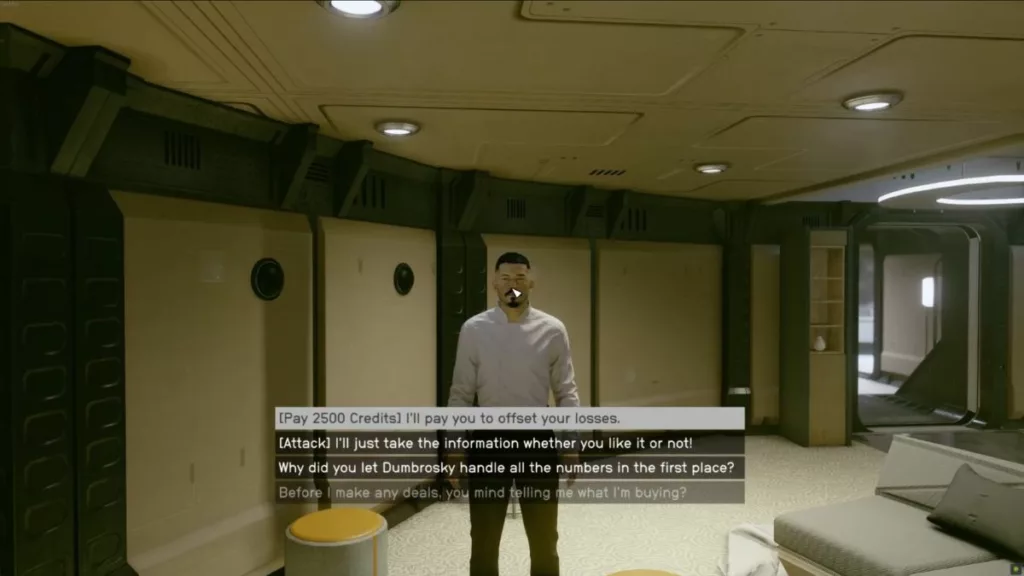
Location: Siren of Stars/Aranae system (During Breaking the Bank)
There is only one way to acquire GalBank Plan (Evidence). After you disable Siren of the Star’s life support systems and head to Gabriel Vera’s Cabin to confront him, you must bribe him with 2,500 Credits to receive the evidence. There is no option to persuade Gabriel Vera, and attacking him will cause you to miss the evidence. So, get ready to say goodbye to your 2,500 Credits (which is pennies anyway).
Huan’s Talk
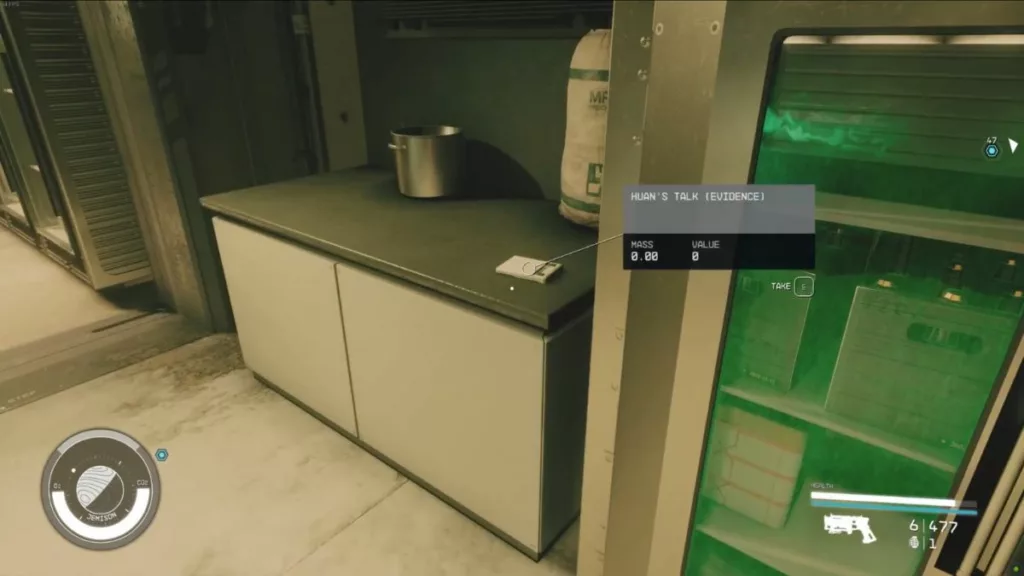
Location: The Well, New Atlantis/Jemison/Alpha Centauri (During The Best There Is and beyond)
Your first objectie during The Best There Is is to meet the smuggler, Huan Daiyu, on the upper floor of Kay’s House in New Atlantis’ The Well area. Once you receive this objective in your Mission Log, Huan’s Talk (Evidence) will wait for you in Kay’s House kitchen on a counter next to a fridge.
Eubanks & Woods (Missable)
Eubanks & Woods (Evidence) is missable, as you can only enter the SY-920 Star Station during The Best There Is).
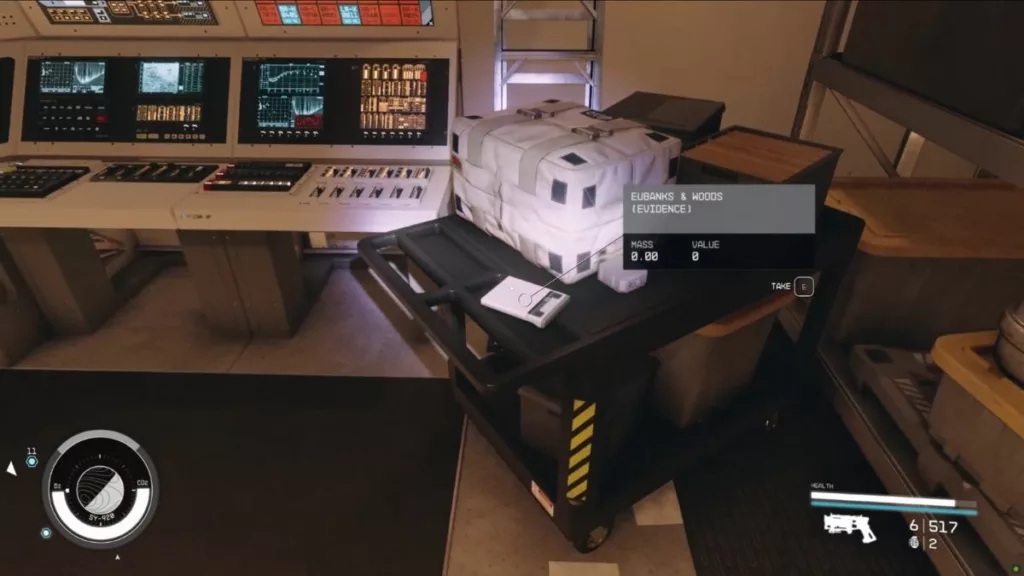
Location: SY-920 Star Station/Luyten (During The Best There Is)
Once you reach the labs area of the SY-920 Star Station, take the stairs to the lower level, where you will find Research Lab 03 and Research Lab 04 (where Dr. Vogel is). To find Eubanks & Woods (Evidence), head to the adjacent room in the back, connecting Lab 03 and 04. You will find the evidence on a wheel cart with boxes and folders next to a large console on the back side of the room.
The Big Score
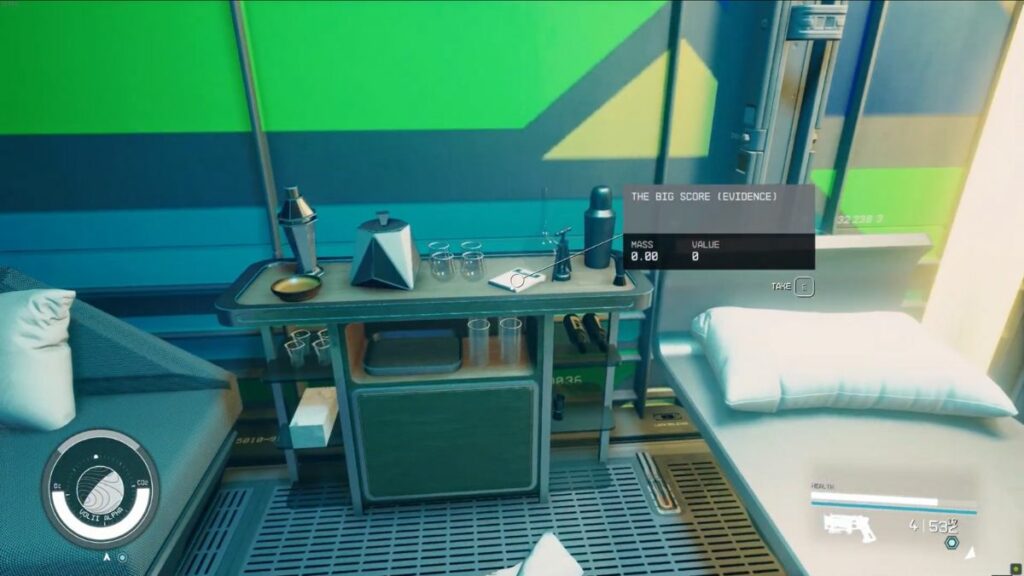
Location: Neon/Volii Alpha/Volii (During Absolute Power and beyond)
At the beginning of the Absolute Power faction mission for the Crimson Fleet, you must meet Estelle Vincent at Madame Sauvage’s Place in Neon’s Ebbside. Once you enter Madame Sauvage’s place, head toward the bar and take the door on the left to enter Madame Sauvage’s room. The Big Score (Evidence) audio slate sits on top of a cabinet between the bed and the corner couch.
Meeting with Bayu
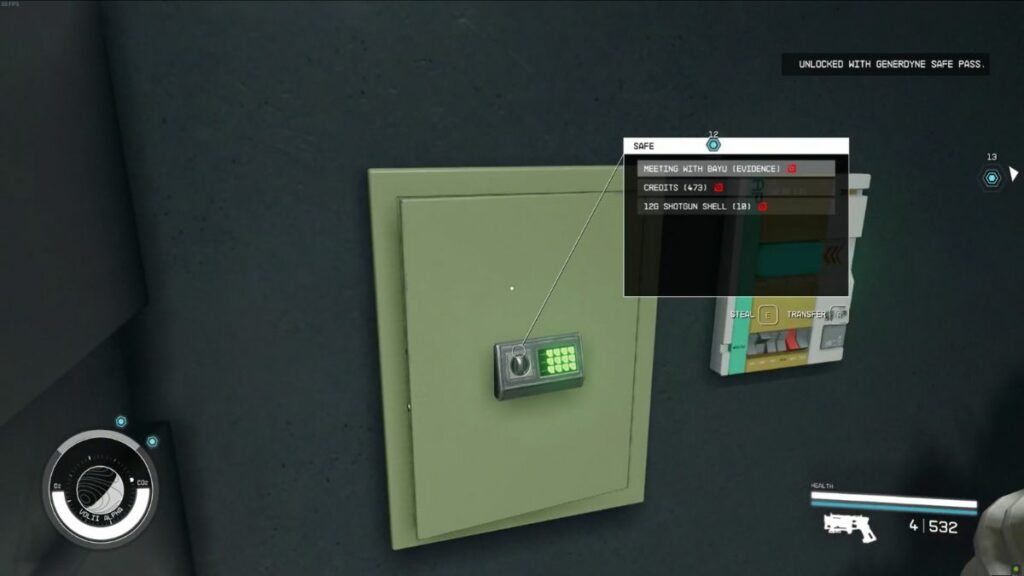
Location: Neon/Volii Alpha/Volii System (During Absolute Power)
After you meet Estelle Vincent, you will receive the optional objective Locate evidence to extort Ayumi Komiko. Completing the objective is a good idea, as it will make your access to Generdyne in the Underbelly easier and provide you with another Burden of Proof evidence piece.
Go to the Trade Tower’s lobby and head to the right of the Astral Lounge entrance to access the elevator. Select the Generdyne Industries, where you can talk to Ji Nashida at the front desk. A persuasion check will be involved, so save before you begin talking. Ask about Ayumi Komiko, pass the persuasion check to receive the key to the safe containing evidence, and head to the private office further in the building. Youll find the safe with the Meeting with Bayu (Evidence) inside. You can close the room’s blinds and sneak to ensure you are Hidden (if you have Stealth Rank 1) before opening the safe and stealing the evidence and items inside.
Ayumi’s Offer
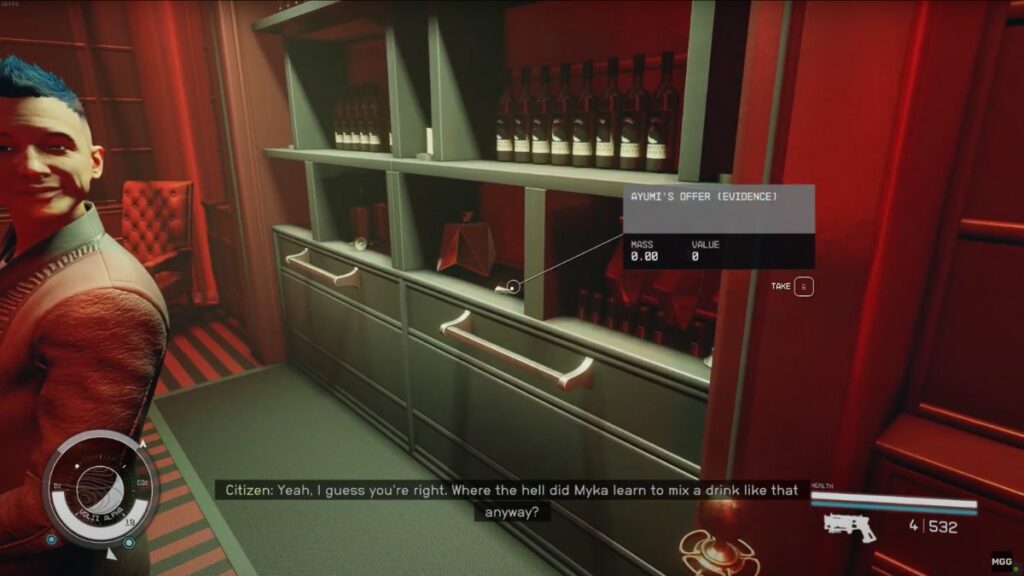
Location: Neon/Volii Alpha/Volii (During Absolute Power)
The steps to trace Ayumi’s Offer (Evidence) are essentially a great follow-up to the previous evidence piece. After you acquire the data slate that will help you extort Ayumi Komiko, you must meet her at Euphorika’s Members’ Lounge. To do so, talk to Myka, the bartender, and pay 5,000 Credits to access the lounger. Inside it, you will find Ayum’is Offer behind Kyu, the Member’s Lounge bartender. There is no need to sneak for this evidence as it’s not marked with the red “steal” label.
Message for Bog (Missable)
Image: Bethesda Game Studios/Bethesda Softworks via Polygon
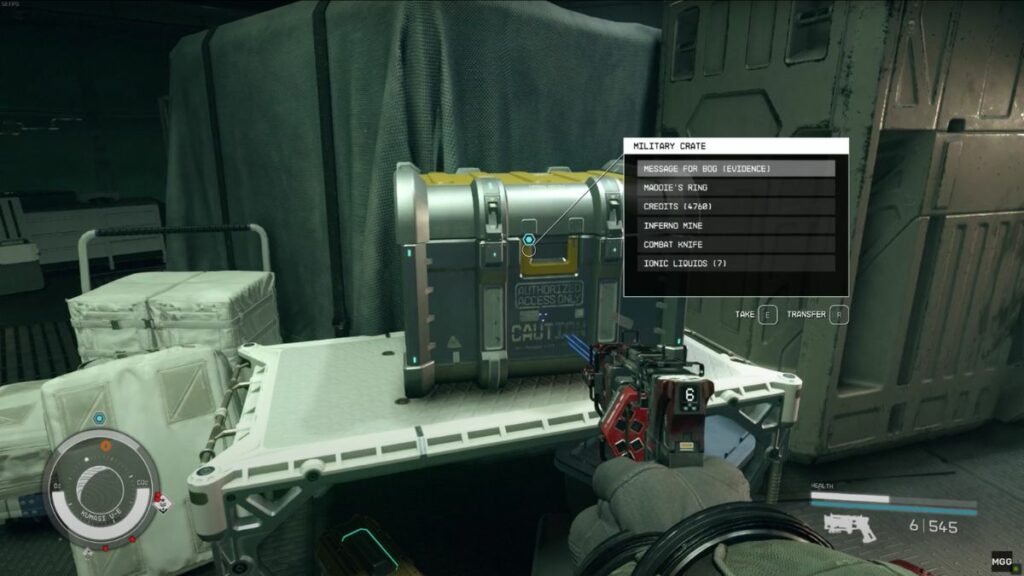
Location: Abandoned Ecliptic Garrison (During Reclaiming the Past side quest)
This piece of Burden of Proof evidence is missable as it’s only obtainable through the Reclaiming the Past quest, handed to you by The Key’s bartender, Bog, at the Last Nova bar. If you intend to side with UC SysDef instead of the Crimson Fleet, you won’t be able to acquire Message for Bog after Eye of the Storm. The Garrison’s location is also random, so you can’t just visit it without starting the quest.
Message for Bog (Evidence) is inside a Military Crate in a not-so-abandoned Ecliptic Garrison. You will find Maddie’s Ring inside the same Military Crate so that an objective marker will lead you to the military crate during the mission.
Gennady Ayton
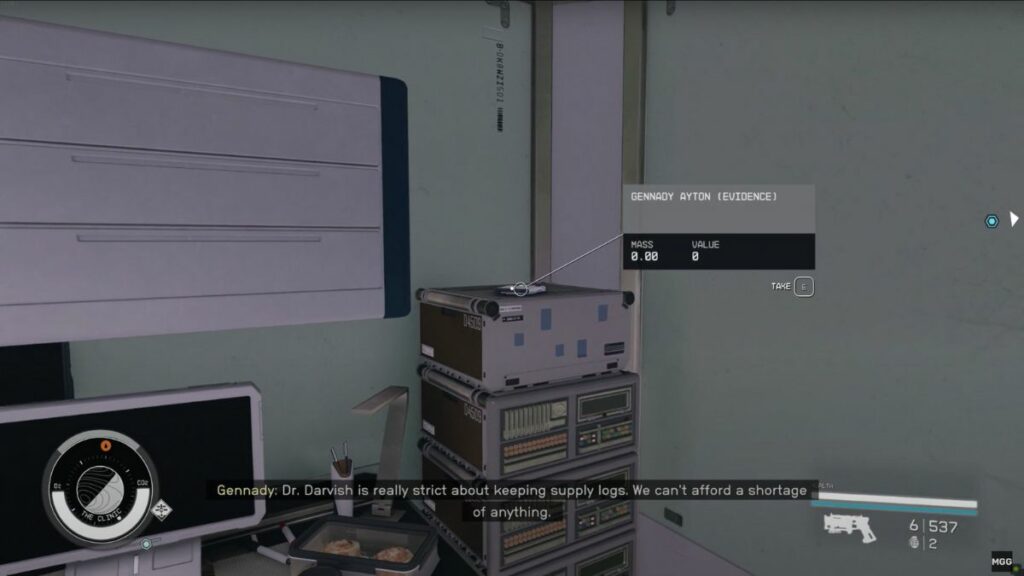
Location: The Clinic/Deepala’s orbit/Narion System (During Doctors Orders side quest)
Samina, The Key’s doctor, will hand you a side mission, where you must visit The Clinic, orbiting Deepala, and “persuade” Gennady Ayton to send Medical Supplies to The Key. You will find Gennady Ayton (Evidence) on top of a stack of servers next to the desk with the computer in the same room you meet Gennady Ayton. Once again, you don’t have to steal this evidence. Additionally, this shouldn’t be a missable as I think you can visit The Clinic and loot the data slate even without completing the Doctor’s Orders side mission.
Mira’s Demise (Missable)
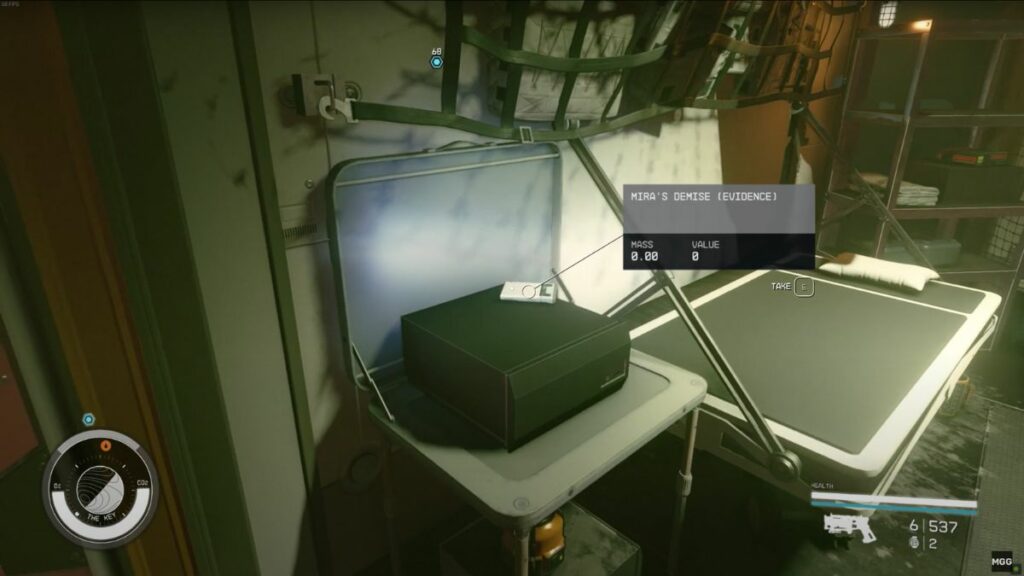
Location: The Key/Survorov’s orbit/Kryx System
You will find Mira’s Demise (Evidence) atop a box inside the room with the large barbell in The Key’s Bunks. To access the Bunks, go to the Reckoner’s Core and take the path leading you to the Operations Center elevator, but instead, head straight. You will see a BUNKS sign straight ahead. Keep moving forward and enter the penultimate room on the left side to find Mira’s Demise audio slate.
Request A17 (Missable)
Location: The Key/Survorov’s orbit/Kryx System
As you enter The Key’s Cargo Bay, you will find Jasmine Durant’s, aka Jazz’s, office on your left. Jazz is The Key’s Ship Services Technician, and you can access her office from its right side by heading to the library. Request A17 (Evidence) can be found in the Data Slate and Keycard display on the right side of Jazz’s computer and the room’s intercom device.
Voss’s Parts (Missable)
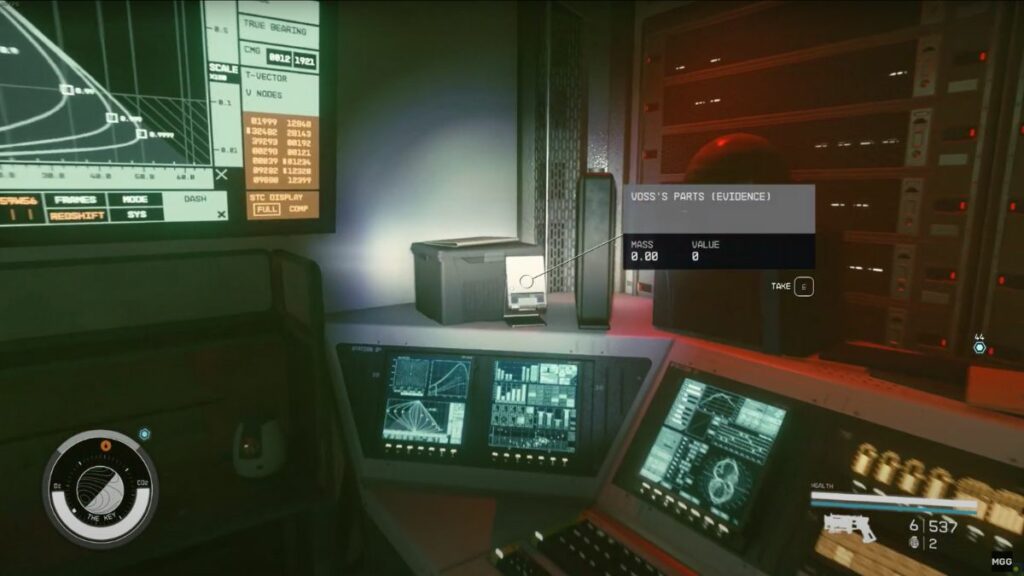
Location: The Key/Survorov’s orbit/Kryx System
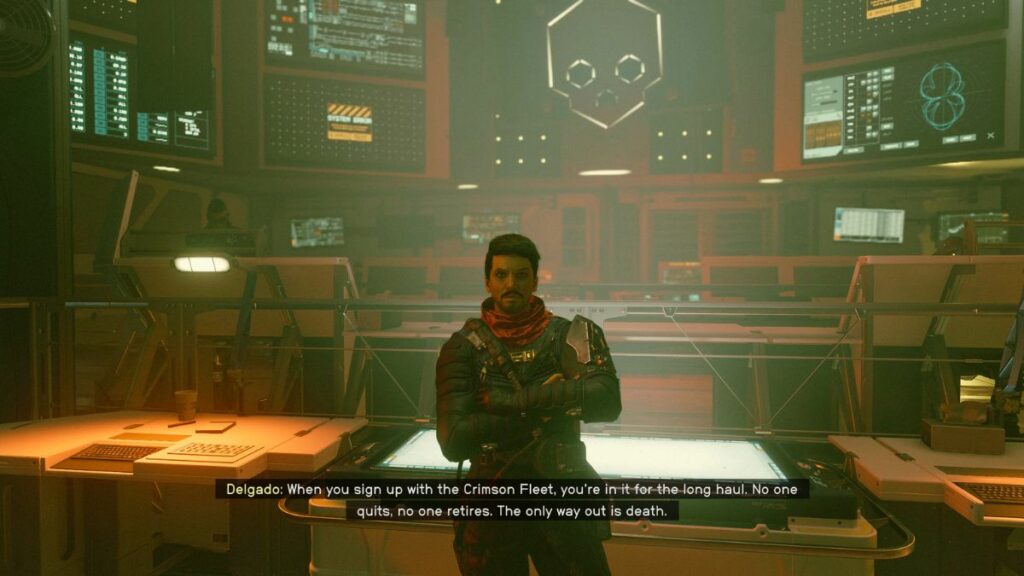
While exploring The Key, you will find Delgados office and his private quarters on the upper balcony of the operations center. Enter the room and head towards Delgado’s computer in the front left corner. The Vosss Parts (Evidence) data slate sits in a data slate display to the left of the computer.
Kreet Order
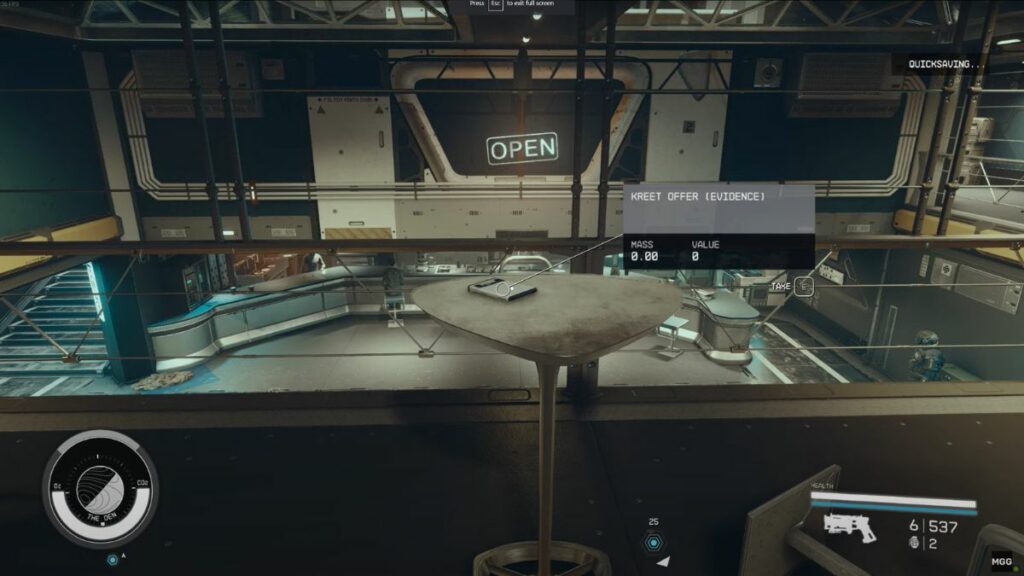
Location: The Den/ Orbiting Chthonia/ Wolf System
The Den is a popular destination for every smuggler in Starfield, so it’s natural to expect some connection to the Crimson Fleet. You will find Creet Order (Evidence) on a table overlooking the Den’s bar as you leave the station’s Trade Authority outpost.
Chunks Heist
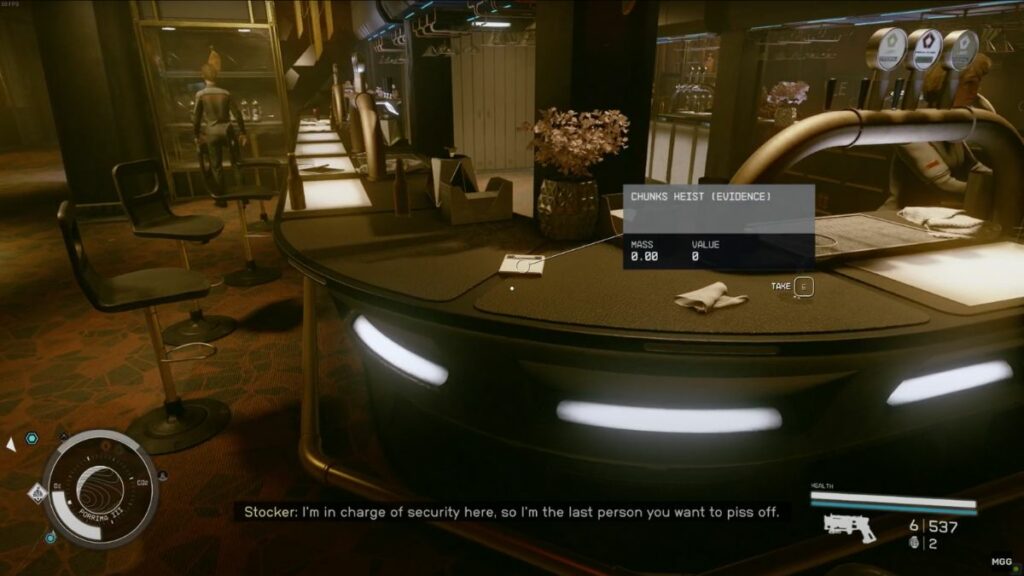
Location: Red Mile/ Porrima III/ Porrima System
The other popular destination for Smuugler’s is Red Mile, so of course, you can expect another Burden of Proof evidence piece in the area. You will find Chunks Heist (Evidence) on the bar, left of the Bartender.
Hopetown Raid
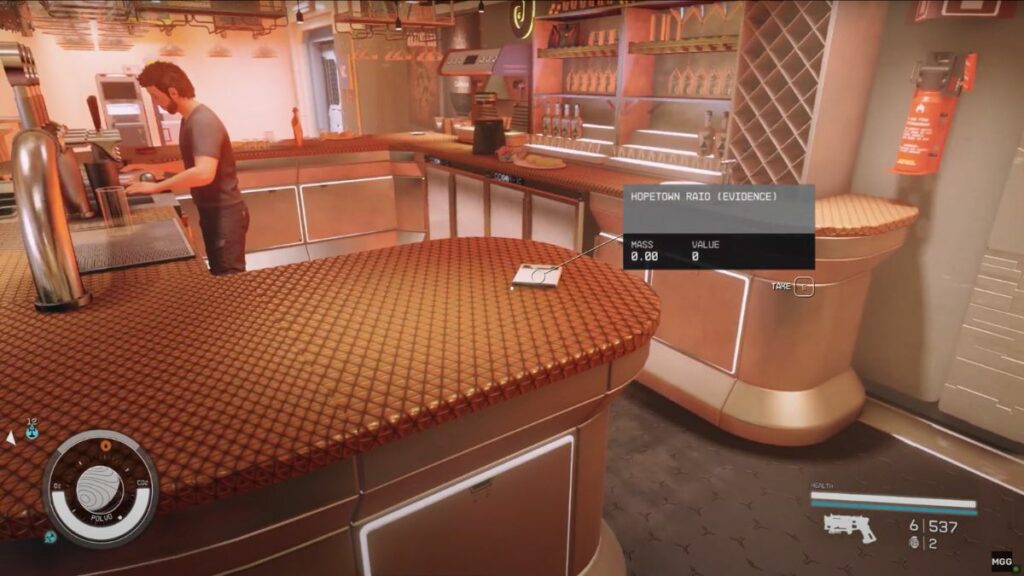
Location: Hopetown/ Polvo/ Valo System
Another Burden of Proof evidence piece related to a bar. Visit HopeTown and head to its bar, Pit Stop, straight ahead of the Spaceport’s exit. You will find Hopetown Raid (Evidence) on the right side of the bar.
Chiroptera
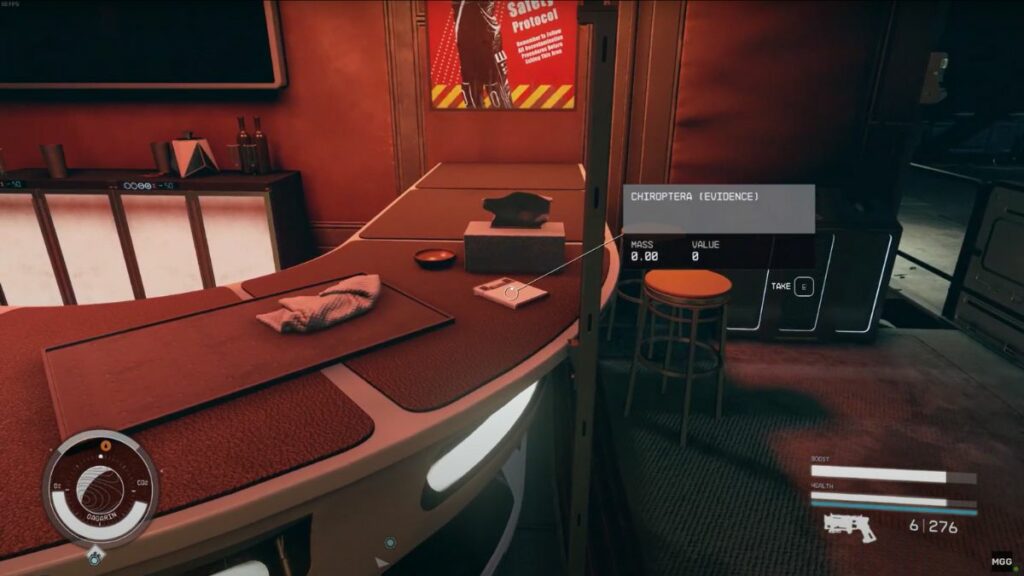
Location: Gagarins Landing/Gagarin/Alpha Centauri
The next piece of evidence for Burden of Proof is tantalizingly close, situated in Gagarin’s Landing on Gagarin in the Alpha Centauri system, merely a stone’s throw from the bustling hub of New Atlantis. Once you land, head toward the densely structured complex that looms ahead. Head straight until you see a flight of stairs descending into the heart of the complex. Follow them down, then continue straight, bypassing Centauri Mills, until you reach a bar bathed in a warm, red glow on the left side of Yur Gagarin’s statue. You will find the Chiroptera (Evidence) on the right side of the bar, close to Lizzy Ajello.
GBLR013: Mortem Obire
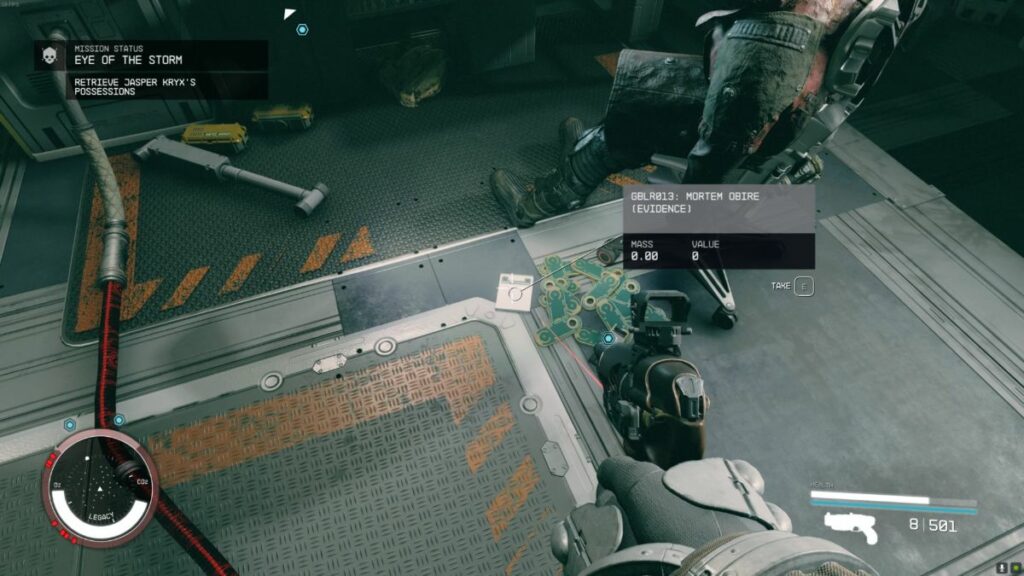
Location: GalBank Legacy/Bannoc IV’s orbit/Bannoc (During Eye of the Storm)
The final piece of evidence is located inside Legacy’s control room, overlooking the ship’s vault, where all the Credits Jasper Kryx was looking for. I called it the final piece of evidence, because ideally you must have completed Burden of Proof before Eye of the Storm, so you can hand this in for an extra XP and Credits reward (or never hand it over to Lieutenant Toft if you side with the Crimson Fleet).
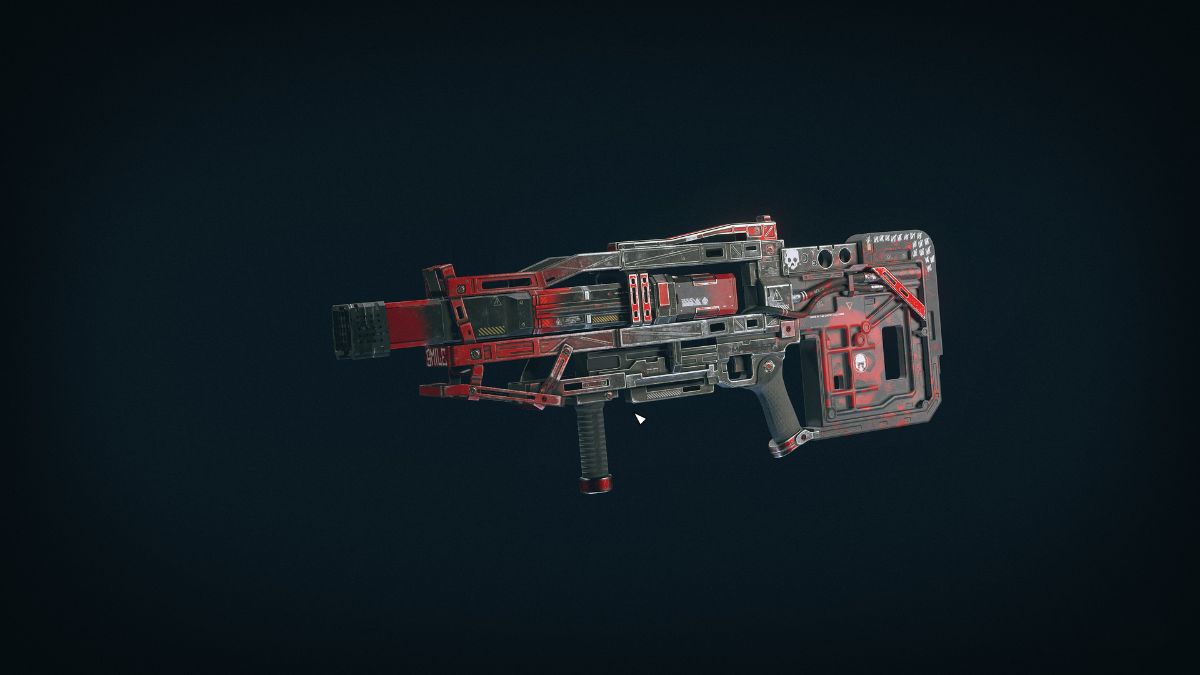
When you find Jasper Kryx’s corpse and receive the objective “Retrieve Jasper Kryx’s Possessions,” one of them will be the GBLR013: Mortem Obire (Evidence) audio recording, among several Credstiks and close the console where you can loot Reventant, Jasper Kryx’s Legendary Rifle. This is the thirteenth and final audio log you can find inside the legacy.
Burden of Proof Rewards
Handing over evidence for Burden of Proof will reward you with XP and Credits. Additional benefits include:
- Learning more about Lieutenant Toft’s past as you submit more evidence.
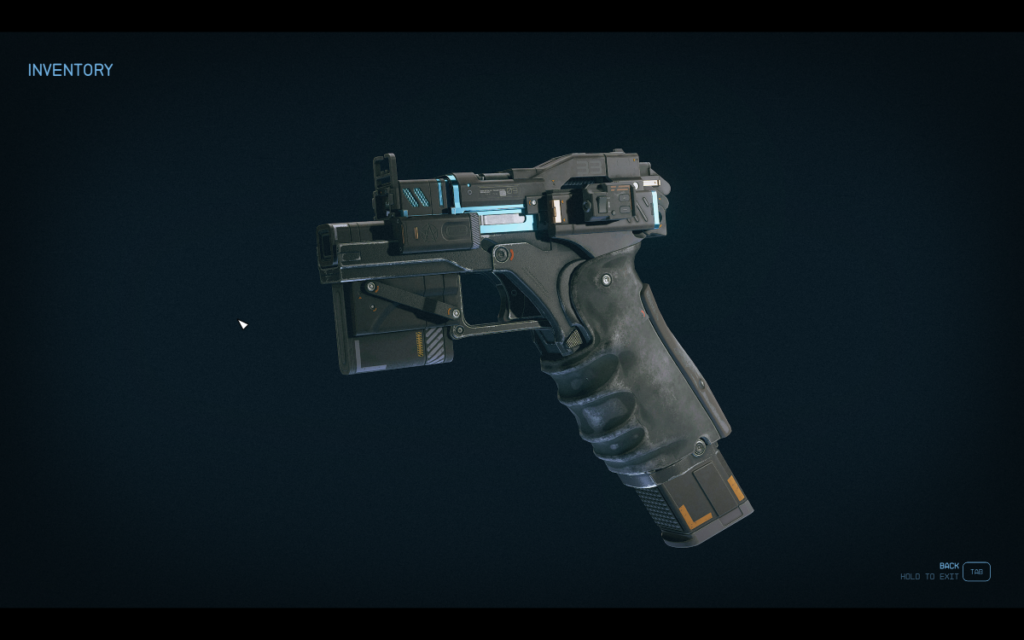
- Completing the quest by submitting at least 15 pieces of Burden of Proof evidence will complete the quest and reward you with Memento Mori, Lieutenant Toft’s pistol.
- Submitting more evidence means you will have more starships on your side during Legacy’s End if you side with UC Sysdef. On the other hand, you will have more enemies to take down if you side with the Crimson Fleet.

- Sextant Shield Systems 20T Hauler Cargo Hold: Starfield - April 24, 2024
- Sextant Shield Systems 30T Hauler Cargo Hold: Starfield - April 24, 2024
- Sextant Shield Systems 400CM Ballast Cargo Hold: Starfield - April 24, 2024
