
Bethesda’s latest RPG, Starfield, offers a vast universe ripe for exploration, and mastering the use of its maps is key to navigating the galaxies. Here’s your guide to accessing the map in Starfield.
With a staggering count of over 1,000 planets (manually made or procedurally generated) to explore, it’s easy to feel daunted. To add to the challenge for avid space adventurers, Starfield doesn’t feature just a single map but multiple ones.
The primary map, the Starmap, is your cosmic atlas, guiding you through space. On the Starmap, players can view Galaxies, Star Systems, and individual planets and their resources. Meanwhile, the Surface Map becomes indispensable when exploring planetary surfaces in the game.
This guide will walk you through everything you need about opening and viewing the Starfield map. We’ll also help you distinguish between the various types of maps at your disposal, ensuring a smoother and more efficient exploration experience.
How to Open & Use the Starmap in Starfield
In Starfield, the Starmap is your interstellar navigator, leading you across various star systems and celestial bodies. The Starmap offers three different views, the map of all galaxies (Galaxy/Settled Systems Map), which is the most general one, the map of the selected Star System once the player selects one, and the map of the selected planet once the player selects one.
Here’s a guide to accessing the Starmap:
For PC Users:
- Keyboard Shortcut: Simply press the ‘M’ key to bring up the Starfield map.
- Game Menu: Hit ‘ESC’ to open the game menu, then select the ‘Starmap’ option.
For Console Players:
- PlayStation: Tap the ‘Touchpad’ button to access the map.
- Xbox: Open the map using the ‘View’ button (represented by two squares).
Starmap Key Controls
- To Show Yourself: Press ‘V’ on your keyboard or ‘Y’ on your Xbox controller.
- To Select: Click the left mouse button or press ‘A’ on your Xbox controller.
- To Zoom In: Scroll up with your mouse wheel or press ‘RT’ on your Xbox controller.
- To Zoom Out: Scroll down with your mouse wheel or press ‘LT’ on your Xbox controller.
- To Open Resource View: Press ‘R’ on your keyboard or ‘LB’ on your Xbox controller after selecting a planet.
- To Pan Up: Press ‘W’ or the Up Arrow on your keyboard, or use ‘D-Pad Up’ on your Xbox controller.
- To Pan Down: Press ‘S’ or the Down Arrow on your keyboard, or use ‘D-Pad Down’ on your Xbox controller.
- To Pan Left: Press ‘A’ or the Left Arrow on your keyboard, or use ‘D-Pad Left’ on your Xbox controller.
- To Pan Right: Press ‘D’ or the Right Arrow on your keyboard, or use ‘D-Pad Right’ on your Xbox controller.
Additionally, you can head to the ship’s control panel or the navigation table in your spaceship. Interacting with this will manually open the Starmap. This variant of the Starmap often offers more comprehensive details, making it easier to chart routes between different star systems.
Galaxy/Settled Systems Map
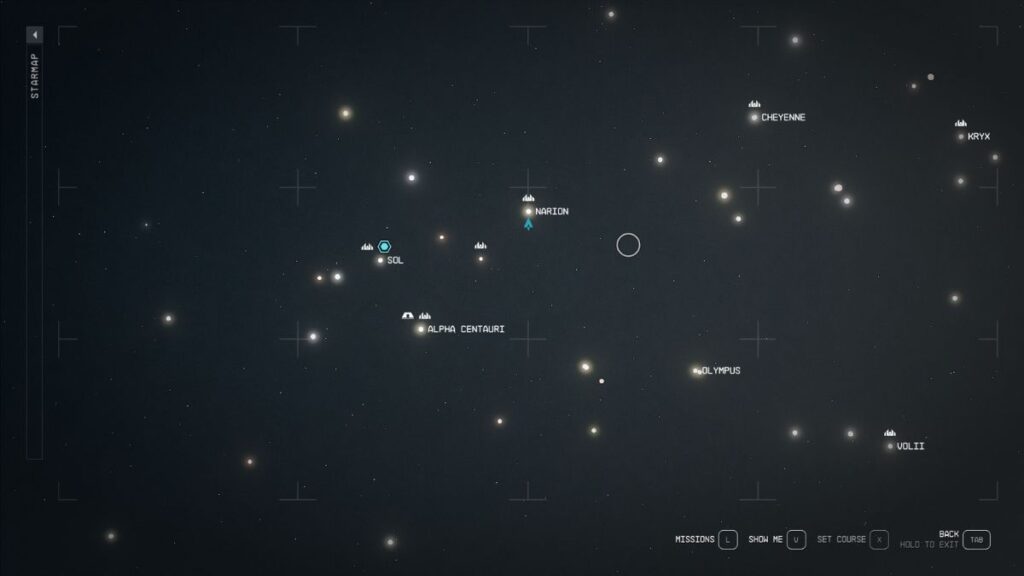
The Galaxy Map stands as the grandest and most comprehensive of all maps in Starfield, where each shimmering orb represents a visitable solar system. It serves as the navigational heart for interstellar journeys, outlining the celestial pathways needed to traverse from one system to another. Here, red spheres of light are marked uncharted territories, beckoning players to new adventures. Players must select their desired destination to view the necessary travel route to embark on these unknown systems.
However, voyages to these new realms require a step-by-step approach: players must Grav Jump through familiar systems they’ve previously explored. A system is marked as explored simply by entering the vicinity of any planet within it, turning it into a known point on your Galaxy Map. The player’s current location is highlighted by a blue icon, making it easy to identify one’s position in the vast cosmos. Solar systems housing sprawling urban landscapes are also denoted with small white building icons, guiding explorers to civilizations amidst the stars.
Star System Map
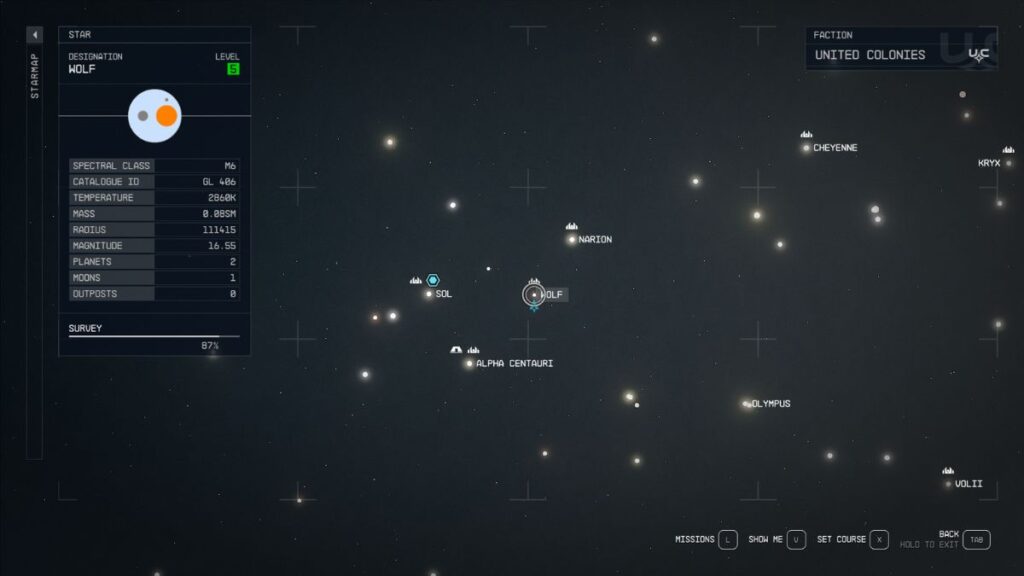
The System Map in Starfield elegantly encapsulates key details of each celestial body (planet or moon) within a given system. At the screen’s upper left, players will find a concise yet informative overview: the system’s name, a recommended level for all its planets, a visual display of each planet along with their moons, and the overall exploration progress indicated by the total survey percentage. Here is what each planet color means:
- Orange: Gas Giant Type
- Grey: Barren Type
- Green: Rock Type
The top right corner of the System Map is reserved for crucial political details: it identifies the faction in control of the system.
Additionally, should you have any outstanding bounties with this faction, they will be prominently displayed here. A small blue icon marks your current planetary location to assist in orientation, ensuring you’re never lost amidst the stars.
Finally, hovering over a planet will reveal information about its type, atmosphere, gravity, temperature, magnetosphere, fauna (if any), flora (if any), water, and resources.
Planet Map
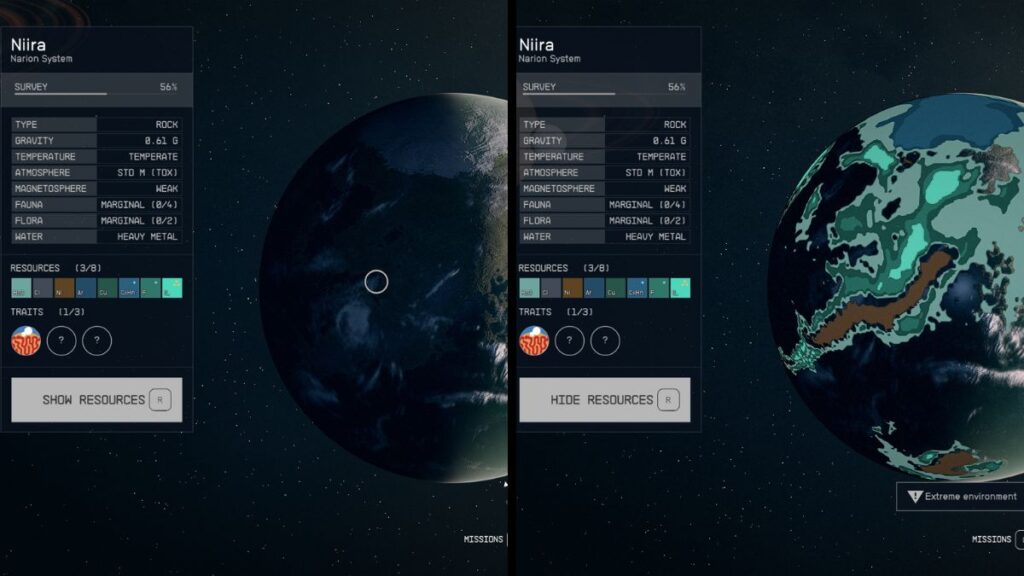
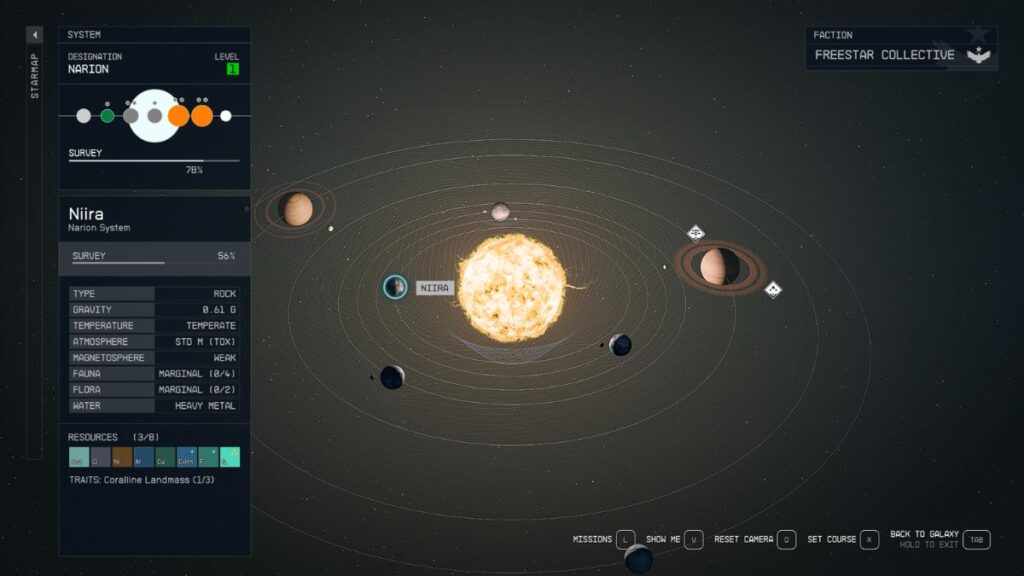
The System Map in Starfield charts the stars and invites a deeper dive into each planetary sphere. When a planet piques your interest, selecting it will unfold its dedicated menu within the system. This menu thoughtfully arranges essential information along the left side of the screen: the planet’s name, its distinctive traits, and the total survey percentage, which includes a breakdown of specific scan targets and the planet’s primary resources.
For a more detailed exploration of what the planet offers, the ‘Show Resources‘ option transforms the display, revealing a richer, more precise map of the available resources, highlighting the locations of resources discovered by a planet scan (which can also reveal traits on occasion once you rank up the Astrophysics skill). As you survey a planet from this vantage point, Starfield presents two compelling choices: fast-travel to one of the major landmarks already discovered or embark on a more personal journey by selecting your own unique landing site anywhere on the planet’s surface.
How to Open & Use the Surface Map
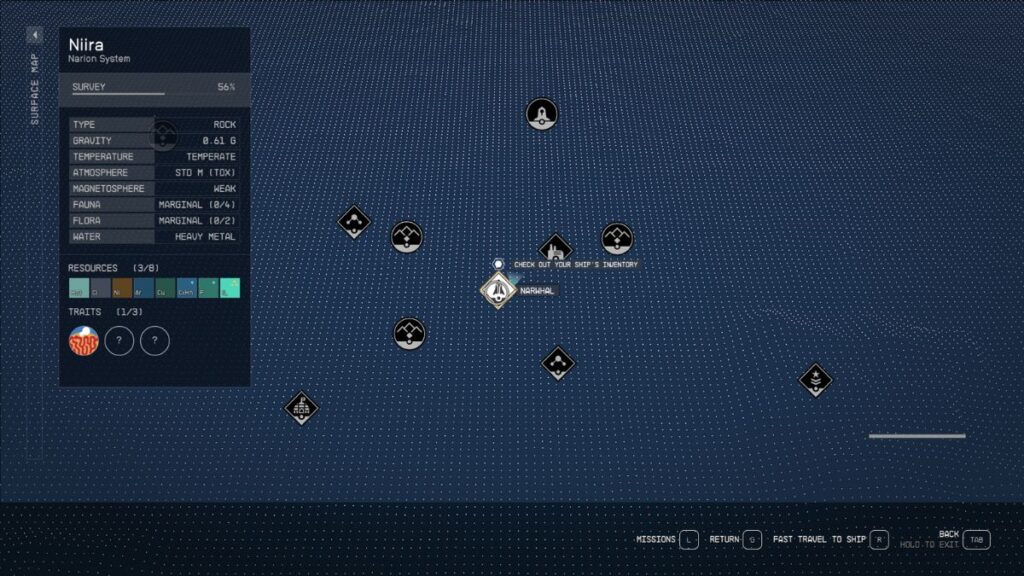
While occasionally opaque in its operation and not very intuitive, the Surface Map in Starfield serves as a useful tool in highlighting various points of interest on planet’s surfaces. These locations are not only key for fast travel but also guiding exploration. The menu, consistent with the planet’s menu found in the previous interface, is displayed along the left side of the screen.
It provides a basic 2D representation of the planet, an invaluable aid in orienting your travels, pinpointing quest destinations, and choosing fast travel points. However, when navigating the intricacies of a city on a planet, the Hand Scanner proves to be a more efficient tool. It seamlessly identifies points of interest, offering a more direct and interactive way to engage with your surroundings than the map.

- Reladyne Nova 1050 Engine: Starfield - April 30, 2024
- Reladyne Nova 1040 Engine: Starfield - April 30, 2024
- Reladyne Supernova 2000 Engine: Starfield - April 30, 2024